Beauty

The Other Eyebrow Routine

IMG_3304 copy.jpgOftentimes when I search for eyebrow routines the first thing that comes up is what makeup to use and how to apply the product. When I search for eyebrow routines my concern is about how to manage all that hair. I come from a family that has rapid hair growth. When it comes to the hair on my head it’s great to know that a bad haircut can be naturally look better in a few weeks, but when it comes to the hair on my body it becomes a totally different story.

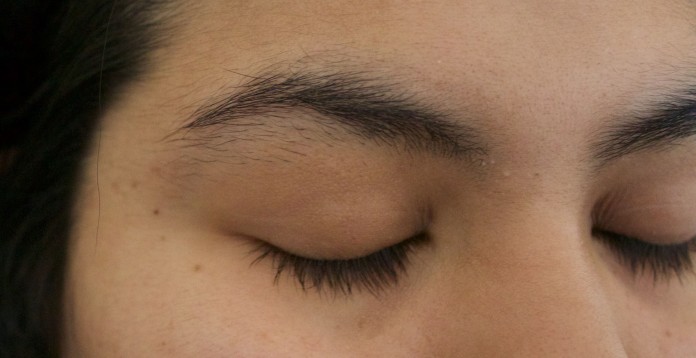
This past December I travelled to four different states. Between all the packing, laundry, and moving around I barely had time to think about maintaining my eyebrows. When I got home right before Christmas I finally had a moment to breath and look at the mirror only to realize the disaster that laid on my face: my eyebrows.

Pathetically, after what felt like an hour of trying to clean up my eyebrows on my own I admitted defeat and decided to just go get them threaded. I prepared myself for the traffic on the streets and crowds of last minute shoppers at the mall.

Now spending 15-20 dollars on getting your eyebrows done isn’t a big deal when you desperately need to get them done; however, if you need to go at least twice a month because you are as hairy as I am then the cost starts to add up. So here are the following tools and tips I believe are essential for maintaining your eyebrows:

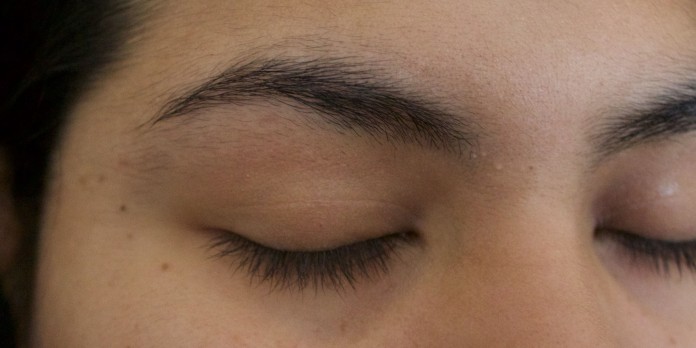
  • Tweezers: the holy grail of eyebrow products. Owning a pair of tweezers is essential to cleaning up the main giveaways of poorly maintained eyebrows. Use this under your eyebrows to clean up any stray hairs that come along. I try to do this two to three times a week.
  • Scissors will take your eyebrows from natural to structured. Owning a pair of scissors is a personal preference, but I like to cut the eyebrow hairs to keep a straight lines on the bottom portion of my eyebrow.
  • An eyebrow razor is what’s going to make all the difference in your eyebrow routine. The area above the eyebrows is often forgotten when doing your eyebrows at home. Tweezers and scissors often can’t get the fine hairs in that area, so using a razor is going to help clean that area up and give it a clean line. I also use the razor for the area between my eyebrows to keep the unibrow away. Be very careful when using this at home though because you don’t want to raze off too much hair as it can be very easy to do.

Spark in Bloom

Currently, I am listening to Lucky Chops – Problem Cover

123

Standard
Travel

Las Vegas – Valley of Fire

Vegas isn’t just a place of bright lights and endless amounts of alcohol. Located just an hour away from the Vegas Strip lies a beautiful rock filled state park. It’s a very underrated place than can easily be explored in one day; however, there are campsites available. If you do visit you should still keep in mind that Southern Nevada is still a desert that gets very hot in the summer, so I recommend visiting in the spring or autumn seasons. If you decide to visit during the warmer months then cool off after by taking a dip at Lake Mead, which is located southeast from Valley of Fire.

If you can’t make a long trip to visit the park then make sure that these two stops are at the top of your list:

  • Elephant Rock: Located right by the east entrance, this spot is easily accessible for all people. With less than a five minute walk from the parking lot you can look up at elephant shaped rock from the side of the road. If you are feeling a little adventurous climb up the surrounding rocks to get spectacular views of the desert and the best photo of the rock. If there aren’t many visitors then take a moment to climb on top of elephant rock to get a very cool photo opportunity.
  • Fire Wave: After enjoying the views from the scenic route that heads north, park at lot #3 and cross the street towards the fire wave. The first bit will require you to walk through sand, which may be difficult for certain persons. It’s only a 1.25 mile round-trip to see a beautiful view.

Entrance to the park costs $10 for out-of state visitors and $8 for residents holding a Nevada ID. Expect to pay more if you are camping. The visitors center has snacks you can buy, but if you are looking for something more substantial then you are going to have to drive outside of the park for it.

I hope Valley of Fire is included in your itinerary the next time you are in Southern Nevada.

Spark In Bloom

Standard
Read

Comic Book Review: Paper Girls

IMG_4049 copy.jpg

Paper Girls Vol. 1 by Brian K. Vaughan, Cliff Chiang, and Matt Wilson

Paper girls follows four 12-year-old paper girls and the mysterious events that happen during their paper route the morning after Halloween. The first issue up with Erin, who leads as the main protagonist of this story, as she is saved by three other paper girls (KJ, Mac, and Tiffany) from teenage boys that are up to no good. The girls decide to stick together for the rest of their paper route; however, an unexplained event causes mysterious events to occur that somehow leads to certain people vanishing. As the girls try to get to safety they come across stragglers, having to decide who is trust worthy and who is not. The story is absolutely addicting and is often left with cliff-hangers between issues.

The majority of the colors in this comic are blues, purples, and grays as the events take place before sunrise. Despite a darker color scheme many of the images are offset with bright accent colors. My favorite art pieces come from some of the one and two-page spreads because it allows the reader to really digest the artwork. Below are non-spoiler images that you are throughout issues 1-5.

The main characters are 12-year old girls, so the language in this comic is very easy to follow. As a warning, there are profanities throughout the issues, especially from bad gal Mac, so if that is something that you are trying to avoid then proceed with caution as this is not suitable for younger audiences.

This comic is absolutely unexpected. I don’t remember what I originally though this comic was going to be like, but what I do know is that the actual story is absolutely not what I could have ever imagined.Luckily the story does not end at issue #5. I am absolutely looking forward to the continuation of this series and the release of issue #6 in June 2016.

overall rating of issues 1-5: 4.5/5.0 


June’s comic will be Ms. Marvel Vol. 1 (Issues 1 – 11). Read along with me and stay tuned for my review next month.

#sparkinbloom

Standard
Food, Recipes

Black Bean Burger

IMG_9343 copy img.jpg

I love finding vegetarian versions of food I love. When I first encountered alternative burger patties it was in the frozen section of the grocery store. Although I do enjoy brands like Dr. Praeger, I knew there had to be a way to make burgers at home. Today I’m sharing the easiest vegan and gluten free burger recipe around.

Ingredients

  • 1 lb Can of Black beans
  • 1.75 cups Oat Flour
  • 1/2 cup + 2 tbs of ground flax seed
  • 1 15 oz. can of corn
  • 3/4 cup chopped bell pepper (100 grams or 1 small bell pepper)
  • 1/4 cup chopped onion (25 grams or 1/4 of an onion)
  • seasonings: paprika, pepper, garlic powder, cayenne, chilli powder

Instructions

  1. Mis together 2 tbs of ground flax seed with 5 tbs lukewarm water. Set this aside to thicken.
  2. Dice or mince green bell pepper and onion. The size depends on how noticeable you want the vegetables to be. I don’t mind mine being a little bigger.
  3. Rinse your black beans and set aside a 3/4 cup of beans. Using a potato masher, mash the rest of the black beans. Ideally, the mixture will still be slightly chunky.
  4. Add and combine the remaining 3/4 cup of black beans, oat flour, flax seed water mixture, 1/2 cup of dry ground flax seed, corn, bell pepper, onion, and seasoning.
  5. Form the mixture into patties. This mixture will make between 8-10 medium sized burgers. If you find that the mixture is too sticky from combining the ingredients then place it in the fridge for about 10 minutes to let it cool. If it is still too sticky then add some oat flour or ground flax seed.
  6. Heat up to your liking. Personally I just put in a non-stick pan with no oil on medium heat and let it cook for about 6-8 minutes each side. If you like it to be a little fried then put some oil in your pan. If you are cooking up more than one burger then you may want to put them in a 375 degree oven for about 20 minutes (10 minutes each side)

I absolutely love these burgers. Since this mixture makes about 8-10 burgers I will take the left over, individually wrap them in plastic wrap, then put them into an air tight container.  When I’m ready to eat one then I’ll put it in a medium heat pan for about 10 minutes each side.

I love eating these protein style (no bun) with romaine lettuce, fresh tomato, and a mustard and sriracha sauce to give it a kick. Served with a side of sweet potato fries, there’s no reason to go back to meat patties.

I hope you enjoy this recipe this summer season!

#sparkinbloom

Standard
Design

Room Decor – How to Easily Transform Your Space

I always wanted a stylish room growing up. In middle school I thought that meant purple walls with my mattress right in the middle of the room. In middle school it was all about bright red walls with zebra and cheetah print scattered everywhere (yikes!). High school led me to blue walls, brown furniture, and a failed attempt at a beach-themed room. In college I moved so often that I never even bothered to fully decorate my room to my liking. Now I’m settled down and finally able to make my place feel like home. Here are some tips on how to spruce up your space:

  • Furniture: When choosing furniture I like to choose one color. This gives the room uniformity and lets the actual decorations be the focal point. A full length mirror is also a great decorative piece that serves a very functional purpose. Trust me, having a large mirror is like having your own dressing room at home.
  • Vases: I never really cared to buy vases because I lack the green thumb to keep flowers alive and fake flowers aren’t really my style. If you have the same mentality then I urge you to think twice. Next time you go to a store take a look at the selection of vases available, because I promise that there are some beautiful pieces out there.
  • Candles/Incense: One of my drawers holds purely candles and incense. Just like vases, there are so many beautiful candles out there. Also, once you finish your candle don’t throw it away! There are many DIY projects that you can do. If you like to switch it up once in a while try buying incense. They give your room a more smoky and natural earthy scent. There are some great holders available as well, especially if you like wooden pieces.
  • Picture Frames: There is never a reason to buy a standard black frame again. If you have a frame in a color that you do not like then an easy fix is to get a bottle of metallic spray paint and go at it. I love choosing metallics because they really make a picture frame shine and look a lot nicer than they actually are.
  • Vinyl Records: Pop by your closest thrift store and check out the vinyl section if they have it. Chances are that the vinyls at thrift stores aren’t very functional, but that doesn’t mean you should let those beautiful covers collect dust. Find some of your favorite bands and hang them on your wall. As a side note, if you do go and buy a new vinyl then I recommend using it for its intended use.
  • Crafts: Be proud of what you make! There are so many crafts that can be easily done at home. Check out my tutorials on making a dream catcher and watercolor calendar. Also, look forward to some upcoming tutorials that can really transform your room. If you aren’t a crafter then check out Etsy. There are some amazingly talented people  out there.
  • Art: You don’t have to be Picasso to display art at home. Etsy also has an amazing art and print collection. You can buy items and have them shipped or you can do one of my favorite things to do lately. Many shops have digital downloads for their prints for a very cheap price (I bought a beautiful floral piece for $1.50). The only caveat is that you have to print the the items yourself, but it still comes out cheaper than having to pay for shipping and handling.

Now that you have some ideas where do you shop? Etsy is a great online seller, but my go-to store to shop for decorations is Ross. I don’t want to break the bank when designing my room. Ross has some beautiful pieces at a great price. TJ Maxx, Marshalls, and other similar stores are always worth a visit because you never know what you will find.

Spark In Bloom

Standard
Fashion

Thrifting Tips

thrift shopping

The best part about thrift shopping is getting amazing clothes for a bargain. A Calvin Klein red rain coat for $5. Yes! Ralph Lauren sweaters for under $10? Hell yes! Despite these steals it can be hard to get the desire to go to the thrift store, especially when I don’t have the time or patience. Here are some of my tips so you can have a hassle-free and enjoyable time when you go thrift shopping.

  1. Go in with a plan: Looking for a denim jacket? Need a new party dress? Either way, think about what you are really looking for and make sure you go to those sections first. Thrift stores are overwhelming and sometimes very scattered, so being organized will help you prioritize your time.
  2. Dress appropriately: I get it, your chunky heeled boots, bodycon dress, or 10 layers of clothes make you look very stylish; however, they’re not the most practical things to wear. I don’t care what people say, leggings and a plain t shirt make trying on clothes very easy. If you do want to still be dressed up then choose clothes that will be comfortable when trying on the item you are looking for. For example, if your number one priority is to get a new pair of jeans then dress in something that will make trying on pants easy. The point here: dress in an outfit that will be very easy to take on and off in the dressing room.
  3. Don’t buy something just because of the price: I get it. I’m a sucker for deals too, but don’t let that trap you into something you will never wear. In the end you’ll end up wasting your money.
  4. Do not buy something that needs to be altered (unless you are actually serious about altering it): If you are anything like me you will try something on in the fitting room, make plans in your head about the changes, and then go home and never do it. Unless you have the skills to make the changes yourself then don’t buy it. Also, sometimes getting something altered can be more expensive than the actual product you are buying, so be cautious of that.
  5. Ask yourself “how am I going to style this with items I already own?” Great, you found a fur jacket that you like. You’re in the dressing room already imagining how to embrace your inner Kim Kardashian by matching the jacket with a tight dress and knee-high heeled boots. Well, do you even own the tight dress and boots? Unless you have a very eclectic style, then make sure you are able to match it with clothes you already own so you can get the most use out of your clothing item.
  6. Inspect, inspect, inspect: Even if that Marc Jacobs shirt is only a dollar it’s not worth getting it if there is a stain, rip, or other problems. Just like tip #4, don’t get it unless you are actually able to deal with the problem.
  7. Wander into the mens section: If you have a much more casual style like I do then don’t be afraid to look in the mens section. It’s the perfect place to find a t-shirt or perfectly oversized winter jacket.
  8. Don’t limit yourself to clothes: Thrift shopping is supposed to be fun, so while you are at your local Savers or Goodwill check out other sections. I have found polaroid cameras, books, home decor, and vinyl records for really great prices!
  9. Know the discounts: Most thrift stores offer discounts on certain days of the week or for holidays, so check with your favorite thrift stores to see when you van get items for a really great discount!

Good luck thrift shopping! Let me know what some of your best finds have been.

#sparkinbloom

Standard
Fashion, Organization

Clean Out Your Closet Pt. 1

If you are anything like me then your closet somehow becomes a place to hoard things you forgot you even owned. I knew I wanted to cut down on what I own, but I didn’t want to make this a stressful process. Some guides on how to clean out your closet are very strict in what you can and cannot do. I didn’t want my method to be like that. Instead I wanted an option that would allow me to re-evaluate again in a couple of months without regretting getting rid of any items that I might have wanted to keep.

How to Clean Out Your Closet Part 1:

  1. Take everything out of your closet. When I say everything I mean it. Take out every single item that is in there, even if it is not clothing. By doing this you will start with a blank slate and evaluate everything that is taking up space.
  2. Clean your closet. As you put back items in your closet it will be nice to know that you are putting it into a clean and sanitized area. If you don’t have a clean area then it will be difficult to maintain the quality of many of your clothing items.
  3. Rearrange furniture (if you have any). Taking everything out of your closet will also allow you to re-imagine your space. Maybe there is a new method of organization that will be more efficient for you. Think about what you currently do not like about your closet and see if there is a way to fix it.
  4. Now that your closet is clean and ready to accept new items it is time to sort them into piles. I used the following six piles as my guidelines:
    1. Keep: items that still fit and you have actually worn more than a handful of times.
    2. Maybe: items that fit but you do not wear often.
    3. Storage: items that hold significant memories or meaning to you but that you do not wear.
    4. Donate: items that will be given away.
    5. Trash: items of poor quality that are not suitable for wearing.
    6. Wash: any items that need to be cleaned before being being sorted into a pile. The only items that do not go here are trash items. Also, you decide if you want to put donated items here before you give them away. Personally, I do wash the clothes before I donate them.
  5. Tips/Rules
    1. If a clothing item does not fit you then DO NOT put it in the keep or maybe piles. Only put it in the storage pile if there is a significant meaning to it. Otherwise put it into the donate or trash piles.
    2. Do not abuse the wash pile by putting items there that you don’t want to deal with until later.
    3. Be really picky with your storage items. I suggest getting a specific sized box to put set number of items in.
  6. Now that you have sorted your items do the following
    1. Organize your keep items in your closet to your method of organization. I put mine by type of item (jackets, sweaters, t-shirts, etc.) then sort them by color.
    2. Put your maybe items into a box and keep it in your closet. Since these are maybe items you will have easy access to the clothing in here just in case you may want to use it. By keeping it in the box also forces you to only use these items when you think about it naturally.
    3. Put your storage items in a storage unit outside of your closet. There is no reason for storage items to take up space in your personal closet. Just make sure the storage unit you choose is still easily accessible for the moments you want to look back at these items.
    4. Put all donated items into bags or boxes and donate them ASAP. Remember, these are the items that were holding you back so get rid of them quickly.
    5. Throw away your trash pile.
    6. Launder your wash pile. Repeat step four for the freshly washed items.

I really hope that these tips help you out. Stay tuned for part 2 of the clean your closet series.

Spark in Bloom

Currently, I’m listening to Kygo – Firestone

Standard
DIY

DIY: Ice Dye

IMG_3554 copy.jpg

When I was a kid I used to tie-dye all the time. Now that I’m older I wanted to revisit that hobby in a different way. Ice dye is a unique method of coloring your fabric. Instead of pouring hot liquid over fabric in intricate designs, it utilizes the melting ice to spread the dye into a soft a very blended pattern. This is a very easy method to try and perfect for the summer.

Supplies

  • Fabric – I used 1 yard of 100% cotton fabric
  • Powdered Dye – I used three powdered dye packets
  • Ice
  • Gloves*
  • Container*
  • Racks*
  • Spoon*
  • Optional: soda ash

*since many dyes are toxic it is important that these supplies are only used for this project and that you do not use them with food. 

When choosing a fabric it is important to keep in mind how that material reacts with dye. Natural fibers like cotton often produce the best results. Materials like 100% polyester and acrylic are a hassle to work with. I suggest reading the labels on your dye packets because many brands have different suggestions and warning.

I used one yard of 100% white cotton cloth for my project. Since cotton works very well with dye I don’t find it necessary to pre-soak it in soda ash. Additionally, the tulip powdered dye I used doesn’t list soaking my fabric in soda-ash as an instruction. Once again, read the labels on your dye packets to get the best results!

The colors I used in my project are:

  • Tulip Teal
  • Tulip Violet
  • Rit Petal Pink

Directions

  1. Put the rack on top of your container and set up your work station in an area where the ice will melt easily. Remember, dyes are toxic so do not do this project in a closed space. I recommend doing this project outside, especially during the spring and summer months.
  2. Dampen your material in warm water. String out any excess water.
  3. Place the fabric on the rack in whatever format you choose. I decided to scrunch it up as tightly as I could.
  4. Cover your material with ice. I used 1 bowl of ice.
  5. Using a spoon start sprinkling the powder over your ice. I used up all three packets because I wanted to saturate my fabric as much as possible. If you want more white spots or a lighter color then don’t use as much dye.
  6. Let the ice melt completely.
  7. Put your fabric in a bag and let it sit for at least 24 hours. I let mine sit for 36 hours.
  8. After at least 24 hours rinse your fabric until the water runs clear. I rinsed my fabric in the bath tub.
  9. Run your fabric in the washer by itself and with no detergent.
  10. Dry and enjoy!

I love the effect that this method gives. There are also so many ways to use this as well. I think I might use my fabric to make a pillow. Try it out this summer and let me know how it goes!

#sparkinbloom

Standard
Design

5 Questions to Answer Before Starting a Gallery Wall

Having a gallery wall has always been a dream of mine. I’m currently redecorating my bedroom from ground zero, so I decided to include a gallery wall in my plans. The process of creating a gallery can be costly and time consuming, so before you start your own project here are some questions to consider:
  1. How large do I want my gallery wall to be?
    The scale of the project is often the most intimidating factor. Whether it’s a section above a couch or a whole wall you should consider what the surface area you want to cover is. Smaller areas are always easier to complete than larger ones; however, if you are aiming for a large gallery wall you should not be discouraged as you can start small and start adding pieces as time goes on.
  2. What type of art will my gallery consist of?
    Typically, gallery walls are composed of framed art pieces, however you should never limit yourself to one style of art. Photographs, paintings, posters, and prints are popular options. Don’t forget about other options as well like protruding art pieces or mirrors to get going as well. Additionally, will the art have another underlying theme? Travel? Family? Artist? The options are endless.
  3. How will you display your art?
    A classic approach to creating a gallery wall is by mounting your framed art to the wall. Recently, I have been intrigued by different methods of displaying art. Displaying art on shelves has been a popular trend recently. A lower cost option is to use washi tape. An even more creative option is to use clipboards as the primary display.
  4. What color scheme will my gallery follow?
    There are two color schemes to think about for your gallery. First, what color scheme will the art itself have? Do you want purely black and white white, any color under the rainbow, or a specific set of colors? Second, what color scheme will the structural pieces have? For example, if your wall will consist of purely framed artwork will all the frames be one color? If you are taping or putting your artwork on shelving will they follow a color scheme as well?
  5. What will the dimensions of my art be?
    I have always been fascinated by the organized chaos of a gallery wall; however, recently I have been intrigued by the symmetrical art approach. For the most Type A of personalities this is a very clean approach. For those of us who are taking the classical approach with different sized art you may want to take a few minutes to analyze your smallest and largest items. Staying within a certain size range is more appealing to the eye.
For more gallery wall inspiration check out my pinterest board. Good luck with your gallery wall!
Spark in Bloom
Currently I’m listening to Adele – Million Years Ago


Standard
Food, Recipes

Gluten Free Superfood Coconut Banana Bread

In an effort to be healthy I always buy bananas, so whenever I see super ripe bananas on the counter I get a little upset at my failed attempt to make better food decisions. I will usually put the bananas in the freezer to use in a smoothie or make banana ice cream, but this time I decided to make banana bread. I kept this recipe gluten free by making my own oat flour (make sure your oats are gluten free) and added qi’a as an extra superfood feature. Qi’a is basically a mixture of chia seeds, buckwheat groats, and hemp seeds.

Ingredients

  • 2 cups oat flour
  • 1 ½  tsp baking powder
  • ½ tsp baking soda
  • ½  tsp salt
  • 4 ripe bananas
  • 1 tbs coconut oil
  • ½  cup honey
  • ¾  cup coconut flakes
  • ⅓  cup qi’a (optional)

Instructions

  1. If you are making your own oat flour simply put around 3 cups of dry oats into a dry blender and blend on medium for a few minutes until the oats start to break down to a flour like consistency. If you do not have a high-power blender then I recommend blending your oats then after a few minutes putting on a sieve to collect the flour. Put the remaining oats back into the blender and repeat the process until you have two cups of oat flour.
  2. Put the oat flour, baking powder, baking soda, and salt into a bowl and set aside.
  3. In a blender put in 4 mashed bananas, coconut oil, and honey. Blend until smooth.
  4. Put the banana mixture into the dry mixture and incorporate together.
  5. Mix in the coconut flakes and qi’a.
  6. Put the mixture into a loaf pan and bake for 35 minutes at 350 degrees.

Feel free to add any other ingredients like chocolate chips or chopped nuts. Enjoy!

Spark In Bloom

Currently, I’m listening to Fleetwood Mac – Rhiannon

Standard